Sunday, July 31, 2011

LAST CHANCE!!!!!

This is it – really! This is your last chance to sign up as an SU demo AND get a free $40 Christmas project kit that will knock your socks off. If you live close enough to me to do so, sign up and we can assemble our kits together because I’ll get one of these cute Christmas projects, too as your upline!

Here are the details:

  • Limited time kit
  • Cost $99
    • Easy Events stamp set
    • Pennant Parade stamp set
    • Basic Black ink pad
    • Old Olive ink pad
    • Pumpkin Pie ink pad
    • Real Red ink pad
    • Brights 8.5x11 cardstock
    • Just Add Cake designer paper
    • Chocolate Chip Scallop Dots ribbon
    • Note cards (20)
    • Clear mount block C
    • Blender Pen (1)
    • SNAIL adhesive
    • Business supplies
  • BONUS – Christmas Keepsake Project kit ($40 value)
  • My guidance and expertise

You need to know that the minimum retail to stay active $300 per quarter, but you have until the end of your first COMPLETE quarter to get your first $300, which would be December! And once you get started with me in this new adventure, I can help you get some things going that will make getting that $300 a quarter a SNAP!

STARTERKIT

Go to my Stampin’ up! website to sign up NOW: www.fancynancykay.stampinup.net!

You’ll be glad you did!

Friday, July 29, 2011

Card Layer Guide - adapted from a fellow blogger

I just discovered this great card layer guide created by Judy Marshall, a Canadian demo. She figured out all the layer cutting sizes (up to four layers) for all sorts of card sizes.

Because I don't make all those card sizes, I adapted it for my use and am sharing that with you - although you may want to check Judy's out if you make other card sizes, because she has quite a few on her list!


What I did to adapt it is to use only SU envelope sizes (with one exception - to fit legal envelopes) in order to share with my customer base. If you are not a demo or one of my regular customers, please be sure to check out my SU website for all the Stampin' Up! goodies, or, if you are in the Greater Northwest Houston area (Waller, Magnolia, Tomball, College Station, Hempstead, Conroe, Brenham, Cypress, Northwest Houston - are all within spitting distance!), come join me on the Second Saturday at 2:00 for my regular monthly meeting. At these meetings we create 2-3 cards and a scrapbook layout, and sometimes a gifty type item :)

I look forward to seeing you - just email me for directions!

Saturday, July 9, 2011

VC-ROCKS - Blog Hop #3 - Anything but a card!

To backtrack to Jamie's blog, click on her name.


Howdy from Texas! I have some scrapbooking goodies for you today! New goodies used in this layout are marker with an asterisk (*). If you are following the VC-Rocks Blog hop, you should have landed here from Jamie's blog - if not, button above will take you there, plus there's a complete list near the bottom of the post of all 34 stops!

As an avid scrapbooker, I get sketches from a LOT of sources. Some are top secret, some are secret because I just cannot remember where they came from, some really aren't a secret because ethically i have to give credit where credit is due, and some, well, some - I just flat make up, and will be the first to admit that there's a piece from here, one from there, and a few from yonder!

The sketch for this layout is based on one from gotsketch and adapted for Stampin' Up! materials and supplies. It uses: Top Note Die, Blossom Bouquet Triple Layer punch*, Petite Pennants Builder punch*, Lace Ribbon Border
punch*; Garden Green, Wild Wasabi and Certainly Celery cardstock, and Garden Green Pattern Paper from the Regals collection, plus a bit of Whisper White cardstock. White Baker's Twine finishes it up, with a supporting cast of Tombow Multi-adhesive, SNAIL and Stampin' Dimensionals.

I must confess, I have as yet NO, as in none, not a single one, of the current alphabet sets (sigh), so I printed the lettering from My Digital Studio in Garden Green, using just a plain old font (ain't it cool!?!).
The pictures in my layout are (from left) 6.5x6.5, 4x3, 3x3, 3x5 over three that are 2x2. The journaling leads into the title. This big playground was built in my daughter and son-in-law's back yard, which I can see from my stamping area (yes, you grandmothers... be jealous... be very jealous - now, if i can just get my other daughter living that close so her babies - once she's married and has any - can just come running over to Gramcy's house, too, I'll be in tall cotton!!!!). If I had known that it only cost $200 to have that sucker assembled for you, I'd have paid it somehow so my honey and SIL didn't have to nearly kill themselves building it!

Anyway, I thank you for stopping by my stop on the hop. Below is a list of ALL the hoppers, and at the bottom a button that should take you to Patrice's blog! Enjoy the rest of the hop - you are just over halfway done now :).

VC Rocks

http://vcrocks.blogspot.com/

InkPaperStamps

www.InkPaperStamps.com

Elizabeth's Stamp Room

http://elizabethsstamproom.blogspot.com/

Love 2 Stamp

www.elizabethloves2stamp.com

Creative Designs by Jackie

http://jackielwatson.blogspot.com

A Touch of SOL

http://atouchofsol.blogspot.com

Stampin' Stace

www.stampinstace.blogspot.com

Stamp With Jane

www.stampwithjane.com

The Love of Stamping

http://www.theloveofstamping.com

Stamping Fun with Kim

http://stampingfunwithkim.blogspot.com

Life with a Wiener Dog

www.lifewithawienerdog.com

Stampin' At Dawn

www.stampinatdawn.blogspot.com

Created By You

http://createdbyu.blogspot.com

Stamper Shirley

http://stampershirley.blogspot.com

Scrappin' For Sanity

www.scrappin-for-sanity.blogspot.com

Bluegrass Stamper Studio

http://bluegrassstamperstudio.blogspot.com

Technostamper

http://technostamper.blogspot.com

InkingTheNightAway

www.inkingthenightaway.blogspot.com

Wanna Be Creative

www.want2bcreative.blogspot.com

Scrapbook Kits and more

http://fancynancykay.blogspot.com/

My Little Patch of Dirt

www.mylittlepatchofdirt.blogspot.com

I Reckon I'll Stamp

http://www.stampinreckon.blogspot.com

Brenda's Stamping Corner

http://brendasstampingcorner.blogspot.com

Maddiebug Designs

www.maddiebugdesigns.blogspot.com

Stamping in the Moonlight

www.stampinginthemoonlight.blogspot.com

Stampin' Fevre

www.elefevre.blogspot.com

Artful Imagination

www.artfulimagination.blogspot.com

Pretty Inky Papercrafts

www. prettyinky.blogspot.com

Nichole's Stampin' Corner

www.stampinwithnikki.blogspot.com

Clever and Cute

http://www.cleverandcute.blogspot.com/

Mimi To Jett

http://mimitojett.blogspot.com

Shari's Stamp Pad

www.sharisstamppad.blogspot.com

Blinkin' Thinkin' & Inkin'

blinkthinkink.blogspot.com

Krafting With Karen

www.kraftingwithkaren.blogspot.com

Loni's Life

www.loniholt.blogspot.com


Click on her name to go visit Patrice's blog, the next stop in the hop!


Monday, July 4, 2011

$99 Starter Kit! July ONLY - sign up NOW!

If you have been waiting for the perfect time to join my team - this is IT!!!!!! Check out the info below, then, to sign up, simply go to my demo web site - http://www.stampinup.net/esuite/home/fancynancykay/jointhefun.
Click on the JOIN NOW button on the left. You really do NOT want to miss this! I look forward to welcoming you to my team!

$99 STARTER KIT AND FREE PROJECT KIT PROMOTION

Dates: July 1-31, 2011

Promotion Details:
It's always more fun to stamp with friends! The limited-time $99 Starter Kit is the perfect
choice for the lover of Stampin' Up! products. Use this exclusive Starter Kit to share the opportunity with your friends and hostesses who want to get the products they love at a 20 percent discount.


Plus, when you sign up in July, you will get a Christmas Keepsake project kit absolutely FREE--a $40 value! This exclusive kit contains everything you need to create a beautiful Christmas Keepsake Box to hold your most treasured Christmas memories. Remember, you can only earn this special Shelli Signature Collection kit when you sign up NOW! (And - this is one of the things I love about SU - when YOU sign up, *I'll* get one, too!!!!!).

See below for details on the limited-time $99 Starter Kit.

$99 Starter Kit

Contains over $180 in products and business supplies--including new products from the 2011-2012 Idea Book & Catalog! All items below are recommended, but a new demonstrator can substitute a similar item of equal or lesser value.

Page

Item

Description

57

123225

Easy Events Clear-Mount Set*

69

122740

Pennant Parade Wood-Mount Set*

177

102277

Old Olive Classic Stampin' Pad

177

105216

Pumpkin Pie Classic Stampin' Pad

177

103133

Real Red Classic Stampin' Pad

177

119706

Brights 8-1/2" x 11" Assorted Card Stock

180

101179

Basic Black Classic Stampin' Pad

182

107311

Whisper White Note Cards (20)

185

124339

Just Add Cake Designer Series Paper*

195

124142

Chocolate Chip 1/2" Scallop Dots Ribbon*

203

122129

Blender Pen (1)

205

118486

Clear-Mount Block C

206

104332

SNAIL Adhesive

*New to the 2011-2012 Idea Book & Catalog!

Business Supplies

The business supplies in these promotional mini kits will be the same business supplies that are in existing starter kits; no alternative selections can be made for business items.

  • Getting Started DVD
  • Getting Started Guide
  • Guest Invitation Postcards (100)
  • 2011-2012 Idea Book & Catalog (8)
  • 2011 Summer Mini Catalog (8)
  • Stampin' Up! logo vinyl
  • Décor Elements applicator
  • To My Hostess Envelopes (10)
  • My Digital Studio Marketing DVD
  • Recruit Folders (5)
  • Recruit Brochures (20)
  • Customer Order Forms (50)
Things to Remember

$99 Starter Kit
  • Prospective recruits may still purchase either the standard OR Digital+ Starter Kits instead of the promotional $99 Starter Kit.
  • Recommended catalog products are included in the $99 Starter Kit. However, just like our standard and Digital+ Starter Kit, new recruits can select alternate items. For example:
    • An alternate stamp set of equal or lesser value.
    • An alternate color assortment of card stock of equal or lesser value.
    • Alternate colors of Classic Stampin' Pads of equal or lesser value.
  • Recruits can still add the Stampin' Memories, Definitely Decorative, or My Digital Studio Add-On to their $99 Starter Kit for the regular price.
  • Recruits who join Stampin' Up! by purchasing the $99 Starter Kit are still eligible for any programs available to new recruits. This includes, but is not limited to, the Extra 10% Instant Income offer, the newly refreshed Stampin' Start program, and the opportunity to purchase a Business Booster Kit.
  • Starter Kit order form deadlines:
    • Mail: Friday, July 29, 2011 (received in office)
    • Online: Sunday, July 31, 2011; 11:50 PM (MT)

Christmas Keepsake Box Project Kit

  • The exclusive kit is part of the Shelli Signature Collection.
  • The box included in the kit is limited to this kit.
  • Demonstrators and new recruits who earn a kit will be able to order it with their first demonstrator order beginning August 1. Demonstrators and new recruits will have until September 30 to redeem their free Christmas Keepsake project kit.

DBWS Resources

As a new demo, sign up for a Demo Business Web Site, and you'll get TWO MONTHS FREE. Then, YOU can use your DBWS to allow new recruits to sign up with you before this special is over!


I really want one of these - don't you? Have questions about signing up as part of my team? Email me - I'm glad to help!

Thursday, June 16, 2011

Mini tutorial - brad-bow


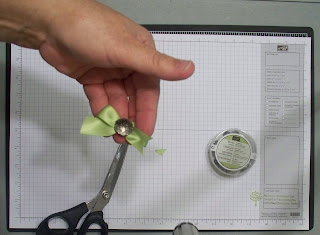
A couple of posts ago, I did a bow using an antique brad and satin ribbon. Several people asked how it was done, so I took a few pictures, which my granddaughter found highly amusing :)
("Whatcha doin', Gramcy? Huh?? Whatcha doin'?)

Anyway - here's what I used - 108360 - Craft scissors; 117273 - Antique brads; 117288 - Certainly Celery 5/8 satin ribbon; 116631 - Paper piercer

1. Cut a piece of 5/8 inch ribbon about 7 inches long, fold in half and give it a little finger crease to mark the mid point.


2. Use the piercer to open up the brad's legs.


3. Open the ribbon up and make your first 'tail', crossing over the midpoint.

4. Cross the other tail over, creating the bow shape.


5. Pick up the brad and rest the ribbon, top side of bow towards the brad head, back side of bow facing up so you can close the legs over it.
6. Gently fold the legs over the back side of bow.


7. Fold each tail end of bow lengthwise and cut from fold out to raw end, creating the notched shape.


Et voila! Finished bow - adhere with sticky strip or glue dots!


Go now - make a bow or two!!!


Saturday, June 11, 2011

At the blog hop.... at the blog hop, yeah....


Welcome to the second installment of the VC_Rocks Blog Hop for 2011. I am excited to be bringing you some Big Shot Beauty today!

If you aren't one of my regular readers, I'm betting you arrived from Kim Abbott's blog - Stamping Fun with Kim !

I have several samples here to show you today:

Of course, I love me some pretty cards, but I was a scrapbooker long before I discovered SU or started making cards! This layout uses a Big Shot alpha AND flower - Little leaves, Alpha Simple (I believe it is) and the flower from an older Sizzix die - which works easily with Mr. Big Shot!
Did you know that under the new upcoming hostess plan, if you have a workshop of $400 or more you get to select any one item in the catalog for 50% off (even Mr. Big!).


The matchbox makes a great little gift - in this case - a teacher appreciation item - holding chocolate, what else? The matchbox die makes it SO easy!

My last share was also CASEd from or inspired by (which isn't far from being CASEd) someone - and again - my filing system failed me - I cannot find where I saved the inspiration card for this. I did this one a little differently, if I recall correctly - which is up for debate as well... I believe the original card called for a brayer... and I - although I have one, use one, and sometimes like it - could NOT get this to brayer correctly. Therefore I used my DD stamp pad and smacked it on the embossing folder before running it through the Big Shot - very carefully. My biggest piece of advice about this one - lay the cardstock very carefully on the inked surface - and close it as carefully as you can, taking care not to slide it on the surface. I used a blender pen and picked up Old Olive ink that I had smooshed into the lid of the OO ink pad to color the raised flower centers that I did not put bling on. Ribbon and bling and a little sentiment stamp finished off the outside of the card. Colors used were Daffodil Delight, Old Olive, and Early Espresso (I could use one of those!).

My favorite tip on using the rhinestones and pearl bling that SU now sells is this: Use the Paper Piercer to take the bling off the waxy backing paper and place on your creation - that way, the oils on your hands or fingers do not remove any of the stickiness. Go ahead, try it - I'll wait :)


Back yet? (whistling)

Oh, HI!

For my last share - here is my scrapbook page for today's Stamp Club. There are a couple of special Big Shot things here - first, though - this is based on the sketch I created (the left page of the original sketch was based on someone's progressive layout, but I have changed it up a bit).

To do the title, you need a couple of fonts, some lightweight chipboard from our DSP packs - these are leftovers from another project. I punched out JNEY from (retiring) GoGo Boots upper case and OUR from Alphabet Simple. I did two cuts of each, and used my (latex!) Tombow Multi-adhesive. (Do not use this product if you have a latex allergy, please - unless yo
u are wearing non-latex protective gear:).


After creating this template, I went back to the Big Shot and ran a three-inch by 12 inch strip of Tempting Turquoise Cardstock through the Big Shot layered as shown: clear plate, cutting platform, 2 DSP chipboard shims, the chipboard word that I created, the Tempting Turquoise cardstock, the silicone embossing pad and the other clear plate.

Really hard to see here - but you get the idea... maybe a little better below - anyway - I also used the retiring Sense of Time (I LOVE this set!). On the original sketch the Top Note die was inside a pocket made by the 6x6 square - you could do that - I'm just using it to set off a photo.

Here is the full layout - the CASE on the left and my extension of it into a two page 12x12 layout above. Hope you love it!

Here is the next blog on the stop, followed by the full line-up. Thanks so much for stopping by - comments *always* appreciated!


NEXT STOP: Kim Overholt - Crafting with Kim

Full List:
00-START VC Rocks Home Blog VC Rocks/Debbie Petersen http://vcrocks.blogspot.com/

01 Jane Hignite Stamp With Jane www.stampwithjane.com

02 Eileen LeFevre Stampin' Fevre www.elefevre.blogspot.com

03 Jayne Stenstrom Jayne Stamps http://jaynestamps.blogspot.com

04 Elaine Wright I Reckon I'll Stamp http://www.stampinreckon.blogspot.com

05 Kristi Jaenisch Stamping in the Moonlight www.stampinginthemoonlight.blogspot.com

06 Cindy Lubbert Sew Much Fun with Cindy www.cindylubbert.blogspot.com

07 Barb Furlong The Love of Stamping http://www.theloveofstamping.com

08 Shari Dudek Shari's Stamp Pad http://sharisstamppad.blogspot.com

09 Dawn Dickinson Inkspiration by Dawn http://dawndstamps.blogspot.com

10 Robin Messenheimer Robins Craft Room http://www.robinscraftroom.com

11 Tammy Q Howell Tarheel Stamper www.tarheelstamper.blogspot.com

12 Veronica Miller Bluegrass Stamper Studio http://bluegrassstamperstudio.blogspot.com/

13 Tessa Boulter Tessa's Finds & Stamped Creations www.tessaboulter.stampinup.net/blog

14 Debbie Martin Clever and Cute http://www.cleverandcute.blogspot.com/

15 Kim Abbott Stamping Fun with Kim http://stampingfunwithkim.blogspot.com

16 Nancy Keithley Scrapbook Kits and more http://fancynancykay.blogspot.com/

17 Kim Overholt Crafting with Kim http://craftingwithkim.blogspot.com

18 Stace Coombs Stampin Stace www.stampinstace.blogspot.com

19 Pam Staples Sunny Girl Scraps
https://www.sunnygirlscraps.com

20 Marisol Gutierrez A Touch of SOL www.atouchofsol.blogspot.com

21 Holly (& The Dog) InkPaperStamps InkPaperStamps.com

22 Jackie Watson Creative Designs by Jackie http://jackielwatson.blogspot.com/

23 Kym Schwinkendorf Artful Imagination www.artfulimagination.blogspot.com

24 Heather schlagel Stamp with me www.stampinschlagel.blogspot.com

25 Mary Jo Price-Williams Technostamper http://technostamper.blogspot.com

26 Heidi Sorg Cheekies Ink Pad cheekiesinkpad.blogspot.com

27 Angela Walters Life with a Wiener Dog www.lifewithawienerdog.com

28 Shirley Northey Stamper Shirley http://stampershirley.blogspot.com

29 carolyn sharkas inkingthenightaway www.inkingthenightaway.blogspot.com

30 Diane Clark-Sutton Stampin Ldygflr62 http://www.stampinldyglfr62.blogspot.com/

31 Mary Campbell Mimi To Jett http://mimitojett.blogspot.com

32 Brenda Hugar Brenda's Stamping Corner http://brendasstampingcorner.blogspot.com

33-LAST Loni Holt Loni's Life www.loniholt.blogspot.com


Thursday, June 2, 2011

EXTRA! EXTRA! Read ALL about it!

Oh, my GOODNESS!!!!!! How can it possibly be time for a new catalog??!?!?!!?!?

Yet, it is! If you want in on some really good deals - keep reading - if you do NOT want the new catalog spoiled for you - STOP - Close this post and walk away - really!!!!!


I'll wait


Are you sure?


Do you REALLY want to know?


I'm not going to spoil much, but there are a few things I want you to know 'cause I like you!


So, you really sure you want to read some spoilers?


OK, but I warned you!!!!!!


In my sidebar is a link to the LAST CHANCE LIST. Click on it or on the words "last chance list" that you just read and go to my website.... go directly to my website.... do NOT pass Go.... do not collect $200 - well, wait - yeah - go get a couple of hundred if you wanna - that way you can buy more stuffs!!!!!!!!!!

In the Last Chance List, you will see some things going away and be SHOCKED! So, here's the spoiler, and I confess, it's a bit anti-climactic....

Just because the 12x12 cardstock packs are on the list does NOT mean they are retiring, no siree!!!! What it means is that (SPOILER ALERT) in the new catty, cardstock will be split into packs of smooth and packs of textured. So if you LIKE the mixed packs, get 'em now!

Here's another tidbit! The pattern packs of colors are on the list - wait - don't worry - they aren't gone either! However, as we all know, everything is getting more expensive, so there will be a moderate price increase on the family colors of pattern paper - personally, I'm pleased that it isn't more. After all - when gas goes up, everything else follows because we transport stuff from lots of other places and that takes gas which costs more....

RIBBON - oh, my - cue sad face - I never met a ribbon I didn't like, especially SU's since it color matches perfectly with our cardstock and inks and DSPs. Some colors in some styles are retiring. There will be new colors to obsess over, but FOCUS - right now, if you want Rich Razzleberry ribbon, you better get on it, girlfriend!

There are even DISCOUNTS on some items, but look out - first come, first served - and once it's gone, it's gone.... only to reappear for 15 times a reasonable price on someone's for sale list or auction site.... so get it now while you can!

One last thing, if you're still reading... on the Last Chance stamps list - please read carefully!!!!!! Sock monkey is NOT retired - but Sock Monkey accessories IS. Also - some stamp sets are retiring in one language, but not all. So please - before you panic and your hubby has to call EMTs.... read carefully - you'll be happier for it.

So now - you are invited to a) indulge in some retail therapy, and b) tell me - what will you miss the most from the Last Chance lists?